-
RestTemplate 1 (서버 or 서버)spring boot 2023. 5. 15. 11:02
학습 목표
1.RestTmplate 사용이유RestTemplate은 Spring Framework에서 제공하는 HTTP 통신을 간편하게 처리할 수 있는 클래스입니다. org.springframework.web.client.RestTemplate 패키지에 존재 합니다. RESTful 웹 서비스와의 통신을 위해 주로 사용되고 기본적으로 동기 방식으로 처리되며, 비동기 방식으로 처리하고 싶을 경우 AsyncRestTemplate를 사용하면 됩니다.
RestTemplate의 대표적인 기능
- HTTP 요청 메서드 지원: GET, POST, PUT, DELETE 등 다양한 HTTP 메서드를 사용하여 원격 서버에 요청을 보낼 수 있습니다.
- URL 변수와 쿼리 파라미터 지원: URL에 동적인 값을 전달하거나 쿼리 파라미터를 추가할 수 있습니다.
- 요청과 응답의 데이터 변환: 요청과 응답의 데이터를 다양한 타입으로 변환할 수 있습니다. JSON, XML 등의 데이터 형식을 자바 객체로 변환하거나, 자바 객체를 JSON, XML 등의 데이터 형식으로 변환할 수 있습니다.
- 요청과 응답의 에러 처리: 원격 서버로부터의 응답이 에러 상태 코드를 포함할 경우, 예외 처리를 통해 에러를 처리할 수 있습니다.
- 인터셉터 지원: 요청과 응답의 전/후 처리를 위해 인터셉터를 등록할 수 있습니다.
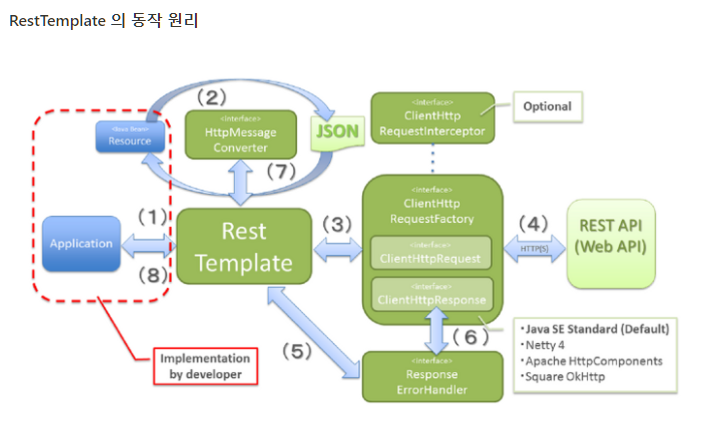
- 어플리케이션이 RestTemplate를 생성하고, URI 등의 헤더를 담아 요청한다.
- RestTemplate 는 HttpMessageConverter 를 사용하여 requestEntity 를 요청메세지로(Http Message) 변환한다.
- RestTemplate 는 ClientHttpRequestFactory 로 부터 ClientHttpRequest 를 가져와서 요청을 보낸다.
- ClientHttpRequest 는 요청메세지를 만들어 HTTP 프로토콜을 통해 서버와 통신한다.
- RestTemplate 는 ResponseErrorHandler 로 오류를 확인하고 있다면 처리로직을 태운다.
- ResponseErrorHandler 는 오류가 있다면 ClientHttpResponse 에서 응답데이터를 가져와서 처리한다.
- RestTemplate 는 HttpMessageConverter 를 이용해서 응답메세지를 java object(Class responseType) 로 변환한다.
- 어플리케이션에 반환된다.
시나리오 코드 1단계
GET 방식에 요청과 문자열 형태로 응답받기
https://jsonplaceholder.typicode.com/
JSONPlaceholder - Free Fake REST API
{JSON} Placeholder Free fake API for testing and prototyping. Powered by JSON Server + LowDB. Tested with XV. Serving ~2 billion requests each month.
jsonplaceholder.typicode.com
// 1. URI 객체 만들기
// 2. RestTemplate 객체 만들기
@GetMapping("/todos/{id}")
public ResponseEntity<?> restTemplate1(@PathVariable Integer id) {

	//URI uri = new URI("https://jsonplaceholder.typicode.com/todos/3");
	URI uri = UriComponentsBuilder
			.fromUriString("https://jsonplaceholder.typicode.com")
			.path("/todos")
			.path("/"+ id)
			.encode()
			.build()
			.toUri();

	System.out.println(uri.toString());

	RestTemplate restTemplate = new RestTemplate();
	// RestTemplate 사용할 수 있는 대표적인 메서드 확인!!
	ResponseEntity<String> response = restTemplate.getForEntity(uri, String.class);

	System.out.println(response.getStatusCodeValue());
	System.out.println("============================");
	System.out.println(response.getHeaders());
	System.out.println("============================");
	System.out.println(response.getBody());

	return ResponseEntity.status(HttpStatus.OK).body(response.getBody());
}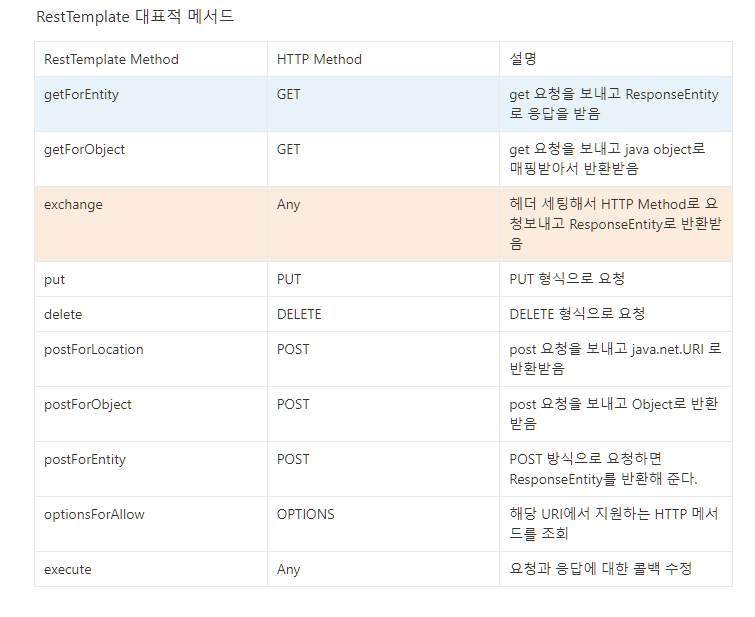
시나리오 코드 2단계
GET 방식 요청과 DTO 변환 하기
package com.tenco.blog.controller;

import java.net.URI;

import org.springframework.http.HttpStatus;
import org.springframework.http.ResponseEntity;
import org.springframework.web.bind.annotation.GetMapping;
import org.springframework.web.bind.annotation.PathVariable;
import org.springframework.web.bind.annotation.RestController;
import org.springframework.web.client.RestTemplate;
import org.springframework.web.util.UriComponentsBuilder;

import com.tenco.blog.dto.TodoDto;

@RestController
public class ApiController {

	// 1. URI 객체 만들기
	// 2. RestTemplate 객체 만들기

	@GetMapping("/todos/{id}")
	public ResponseEntity<?> restTemplate1(@PathVariable Integer id){

		//URI	uri = new URI("https://jsonplaceholder.typicode.com/todos/1");
		URI uri = UriComponentsBuilder
				.fromUriString("https://jsonplaceholder.typicode.com")
				.path("/todos")
				.path("/" + id)
				.encode()
				.build()
				.toUri();

		// queryParam()을 쓸수도 있음.
		System.out.println(uri.toString());

		RestTemplate restTemplate = new RestTemplate();
		// RestTemplate 에서 사용할 수 있는 대표적인 메서드 확인 !
		ResponseEntity<String> response = restTemplate.getForEntity(uri, String.class);

		System.out.println(response.getStatusCode());
		System.out.println("==========================");
		System.out.println(response.getHeaders());
		System.out.println("===========================");
		System.out.println(response.getBody());

		return ResponseEntity.status(HttpStatus.OK).body(response.getBody());

	}

	// 1. URI 객체 만들기
	// 2. RestTemplate 객체 만들기

	@GetMapping("/todos2/{id}")
	public ResponseEntity<?> restTmplate2(@PathVariable Integer id){

		URI uri = UriComponentsBuilder
				.fromUriString("https://jsonplaceholder.typicode.com")
				.path("/todos/" + id)
				.encode()
				.build()
				.toUri();

		RestTemplate restTemplat = new RestTemplate();
		ResponseEntity<TodoDto> response = restTemplat.getForEntity(uri, TodoDto.class);
		System.out.println(response.getBody());
		System.out.println(response.getBody().getId());
		System.out.println(response.getBody().getTitle());
		return ResponseEntity.status(HttpStatus.OK).body(response.getBody());

	}
}
시나리오 코드 3단계
POST 방식에 요청과 DTO 처리 방식
API 문서를 잘 확인하자
	// 클라이언트 --> 서버 --> 외부 서버로
	// 1. URI 객체 생성
	// 2. body에 들어갈 데이터 생성
	// 3. RestTemplate 생성 - (post 방식은 추가 작업 필요)

	@GetMapping("/postsTest")
	public ResponseEntity<?> restTmplate3(){
		URI uri = UriComponentsBuilder
				.fromUriString("https://jsonplaceholder.typicode.com")
				.path("/posts")
				.encode()
				.build()
				.toUri();

		// body에 넣을 데이터 만들기
		PostDto postDto = PostDto.builder()
						 .title("첫만남이야")
						 .body("여기는 후미진 어느 언덕이야")
						 .userId(10)
						 .build();

		RestTemplate restTemplate = new RestTemplate();
		// 인자값 : URI, body에 들어갈 데이터, 파싱될 클래스 타입
		ResponseEntity<PostDto> response = restTemplate.postForEntity(uri, postDto, PostDto.class);
		System.out.println(response.getStatusCode());
		System.out.println(response.getHeaders());
		System.out.println(response.getBody());

		return ResponseEntity.status(HttpStatus.CREATED).body(response.getBody());

	}
시나리오 코드 4단계
POST 방식 요청과 exchange 메서드 사용해 보기
// 1. URI 객체 만들기 @GetMapping("/exchangeTest") public ResponseEntity<?> restTemplate4(){ // exchange 메서드 사용방법 // HttpEnttity 클래스 (body, headers) 생성할 수 있다. URI uri = UriComponentsBuilder .fromUriString("https://jsonplaceholder.typicode.com") .path("/posts") .encode() .build() .toUri(); RestTemplate restTemplate = new RestTemplate(); // 1. HttpHeaders 만들기 // 2. body에 들어갈 key=value 구조 만들기 (데이터 만들기) // 3. HttpEntity 생성해서 결합 하기 HttpHeaders httpHeaders = new HttpHeaders(); httpHeaders.add("Content-type", "application/json; charset=UTF-8"); //httpHeaders.add("key", "value"); // HashMap, MultiValueMap - key = value // HashMap은 fruit : "바나나", // MultiValueMap은 fruit :["바나나", "오렌지", "사과"] MultiValueMap<String, String> params = new LinkedMultiValueMap<>(); params.add("title", "반가워"); params.add("body", "그늘진 어느 언덕 아래"); params.add("userId", "100"); // 인자값 : body 데이터, HttpHeader HttpEntity<MultiValueMap<String, String>> reqEntity = new HttpEntity<>(params, httpHeaders); // URI 객체, METHOD, HttpEntity, returnType ResponseEntity<String> response = restTemplate.exchange(uri, HttpMethod.POST, reqEntity, String.class); System.out.println(response.getBody()); return ResponseEntity.status(HttpStatus.CREATED).body(response.getBody()); }'spring boot' 카테고리의 다른 글
REST API 문서 만들기 (0) 2023.06.26 RestTemplate -3 (kakao) (0) 2023.05.16 JPA & Security - 18 (시큐리티 사용 및 로그인 페이지 커스텀 ) (0) 2023.05.15 JPA & Security - 17 (시큐리티 사용전 주소 설계 확인) (0) 2023.05.11 JPA & security (스프링 기본 파싱 전략 (0) 2023.05.10